
What is a Vacuum tank?
A vacuum tank is a container or vessel that is designed to hold a vacuum or a space with a pressure significantly lower than atmospheric pressure. The vacuum can be used for a variety of purposes, such as removing air or other gases from the tank in order to create a vacuum-sealed environment or applying a vacuum to an object placed within the tank in order to hold it in place.
Application of vacuum tank
- Storing or processing materials or products in a vacuum-sealed environment: Vacuum tanks can be used to store or process materials or products in a vacuum-sealed environment to preserve their quality or extend their shelf life.
- Creating molds for casting plastic or metal parts: Vacuum tanks can be used to create molds for casting plastic or metal parts by applying a vacuum to hold the mold in place.
- Holding objects in place by applying a vacuum: Vacuum tanks can be used to hold objects in place by applying a vacuum to the object. This can be useful for testing the strength or durability of the object or for holding it in place during a process.
- Packaging: Vacuum tanks can be used to package products, such as food or medical supplies, in a vacuum-sealed environment to preserve their quality and extend their shelf life.
- Testing samples: Vacuum tanks can be used to store or test samples, such as materials or products, in a vacuum-sealed environment.
- Other uses: Vacuum tanks may be used for other applications, such as degassing liquids or gases, or creating a vacuum environment for scientific or industrial processes.
Factors to be considered during the Design of a Vacuum tank
- Capacity: The capacity of the vacuum tank should be sufficient to accommodate the volume of material or product that will be stored or processed in the tank.
- Material: The material of the vacuum tank should be chosen based on compatibility with the material being stored or processed, and should be able to withstand the temperature and pressure conditions within the tank.
- Vacuum level: The vacuum level required for the application should be considered when designing the vacuum tank. Higher vacuum levels may require specialized pumps or other equipment.
- Size and shape: The size and shape of the vacuum tank should be appropriate for the application and should allow for easy access to the material or product being stored or processed.
- Features: The vacuum tank should have any necessary features, such as valves, gauges, or controls, to facilitate the desired process.
- Compatibility with other equipment: The vacuum tank should be designed to be compatible with any other equipment that will be used in the application, such as pumps or filters.
- Maintenance and repair: The vacuum tank should be designed to be easy to maintain and repair, and should have readily available replacement parts.
- Cost: The cost of the vacuum tank should be considered when designing the tank, and the design should be optimized to balance cost with the other requirements of the application.
- Static loads: Static loads are constant loads that are applied to the tank over a long period of time. These may include the weight of the tank itself, the weight of the load being stored or processed in the tank, and any additional equipment or fixtures within the tank.
- Dynamic loads: Dynamic loads are loads that vary over time and may include forces such as vibration or impact.
- Seismic loads: Seismic loads are forces that are applied to the tank during an earthquake or other seismic event.
- Thermal loads: Thermal loads are caused by changes in temperature within the tank and may include expansion and contraction of the tank material.
- Pressure loads: Pressure loads are caused by the difference in pressure between the inside and outside of the tank.
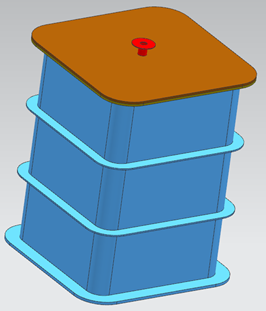
What Shall be the shape of a Vacuum Tank
The shape of a vacuum tank can vary depending on the intended application and the specific requirements of the process that the tank will be used for. Some common shapes for vacuum tanks include:
- Cylindrical: Cylindrical vacuum tanks are shaped like a cylinder and are often used for the storage or processing of materials or products.
- Spherical: Spherical vacuum tanks are shaped like a sphere and are often used for the storage or processing of gases or liquids.
- Rectangular: Rectangular vacuum tanks are shaped like a rectangle and are often used for the storage or processing of materials or products.
- Custom: Custom vacuum tanks can be designed in a variety of shapes to meet the specific requirements of the application.
The shape of the vacuum tank should be chosen based on the characteristics of the material or product being stored or processed, as well as the size and shape of any other equipment that will be used in the process. It is also important to consider the ease of loading and unloading the tank, as well as the ease of maintenance and repair.
Fabrication
The fabrication of a vacuum tank involves the process of creating the tank from raw materials according to a specific design. Here are some general steps involved in the fabrication of a vacuum tank:
- Design: The first step in the fabrication process is to create a design for the vacuum tank. This may involve creating technical drawings or computer-aided design (CAD) models to specify the size, shape, and features of the tank.
- Material selection: The next step is to select the materials that will be used to fabricate the tank. The material should be chosen based on its compatibility with the material being stored or processed in the tank, as well as its ability to withstand the temperature and pressure conditions within the tank.
- Cutting and shaping: The raw materials are then cut and shaped according to the design specifications. This may involve using tools such as saws, shears, or lathes to cut and shape the materials.
- Welding: The next step is to weld the various pieces of the tank together to create a single, seamless structure. This may involve using a variety of welding techniques, such as MIG, TIG, or stick welding.
- Finishing: After the tank has been welded, it may be sanded and polished to create a smooth finish. It may also be coated with a protective finish, such as paint or a galvanized coating, to protect against corrosion.
- Testing: Once the tank has been fabricated, it should be tested to ensure that it meets the design specifications and is able to withstand the required pressure and temperature conditions.
- Installation: The final step in the fabrication process is to install the tank in its intended location and connect it to any necessary equipment or systems.
The fabrication of a vacuum tank may involve additional steps or processes, depending on the specific requirements of the application.
Testing
There are several types of tests that can be performed on a vacuum tank to ensure that it is operating correctly and meets the required specifications. Here are a few examples:
- Pressure test: A pressure test can be performed to ensure that the tank is able to maintain a vacuum or a specific pressure level.
- Leak test: A leak test can be performed to ensure that the tank is sealed properly and does not have any leaks.
- Burst test: A burst test can be performed to determine the maximum pressure that the tank can withstand before rupturing.
- Material compatibility test: A material compatibility test can be performed to ensure that the tank material is compatible with the material being stored or processed in the tank.
- Load test: A load test can be performed to ensure that the tank is able to support the weight of the load being placed in it.
- Seismic test: A seismic test can be performed to determine the tank’s ability to withstand seismic forces and remain stable during an earthquake.
It is important to follow the manufacturer’s guidelines and any relevant industry standards when performing tests on a vacuum tank to ensure the accuracy and safety of the test.
Requirement of Testing
Vacuum tanks must be tested prior to actual application because of the following reason:
- Quality control: Vacuum tanks are often used to store or transport sensitive materials, such as food or pharmaceutical products, so it’s important to ensure that they maintain a proper level of vacuum and are free of leaks. Testing the tanks can help identify any issues and ensure that they meet the required standards.
- Safety: Vacuum tanks can pose a risk if they are not properly maintained or if they fail. Testing can help identify potential safety hazards and ensure that the tanks are safe to use.
- Efficiency: If a vacuum tank is not properly sealed, it may not be able to maintain the desired level of vacuum. This can result in wasted energy and a decrease in the efficiency of the process. Testing can help identify any leaks and ensure that the tanks are working efficiently.
- Maintenance: Regular testing of vacuum tanks can help identify potential problems before they become major issues, thus reducing the need for costly repairs or replacements.
It’s also worth noting that in most cases, the test process involves measuring the amount of pressure or vacuum inside the tank, typically with a special instrument called a vacuum gauge.
Painting of Vacuum Tank
Painting a vacuum tank is a bit more complicated than painting other types of tanks because of the vacuum and the materials that are often stored or transported inside of them. However, with the proper preparation and technique, it can be done successfully.
Generally, the following procedures are followed for the painting of the tank after the completion of fabrication activities:
- Cleaning: Before you start painting, you will need to thoroughly clean the tank to remove any dirt, grime, or other contaminants that may be present. This can usually be done with shot blasting. Shot blasting is a method of cleaning and surface preparation that involves firing a stream of abrasive particles (such as steel shots or beads) at a surface using compressed air or centrifugal force. It’s a popular method for cleaning and preparing surfaces for painting or other types of coatings because it can effectively remove rust, paint, dirt, and other contaminants from a surface without causing significant damage.
- Use the appropriate paint: For vacuum tanks, it’s important to use paint that is specifically designed for use in low-pressure or vacuum environments. Epoxy paint is a common choice, as it is highly resistant to chemicals and provides excellent adhesion.
- Apply the paint in thin coats: When painting the tank, it’s important to apply the paint in thin, even coats. This will help ensure that the paint adheres well to the surface and dries evenly. You may need to apply several coats to achieve the desired level of coverage.
- Allow the paint to cure: Once the paint is applied, you will need to allow it to cure before putting the tank back into service. This can typically be done by letting the paint dry at room temperature for several days, or by heating the tank to a high temperature for a shorter period of time.
Thanks.